 Back in June 2012 I posted about purchasing a Makerbot Replicator 3D printer with dual extruders. Since then, I have been working with it so much that I have neglected many of my other project(s). As such, I intend to document my journey into the world of 3D fabrication.
According to the RepRap wiki:
“RepRap is humanity’s first general-purpose self-replicating manufacturing machine.
RepRap takes the form of a free desktop 3D printer capable of printing plastic objects. Since many parts of RepRap are made from plastic and RepRap prints those parts, RepRap self-replicates by making a kit of itself – a kit that anyone can assemble given time and materials. It also means that – if you’ve got a RepRap – you can print lots of useful stuff, and you can print another RepRap for a friend…
RepRap is about making self-replicating machines, and making them freely available for the benefit of everyone…”
The RepRap movement has spawned improvements and innovations that led to derivatives such as The Printrbot, FoldaRap, Rostock and Replicator. These printers use a method known as extrusion or addictive layering in which material is placed onto a build platform a layer at a time.


One of the first actions I took after many laborious nights of tweaking, adjusting, test printing and more tweaking is heading over to Thingiverse and downloading some open source creations.
One of the first objects I built is a derivative (with some modifications) of the Original Eggbot by Evil Mad Scientist.
Here is the Original Eggbot:

Here is the printable version that is available on Thingiverse:

Here is my version of the printable Eggbot:


I added a modified endplate from here so that my pin attachment will have full range.
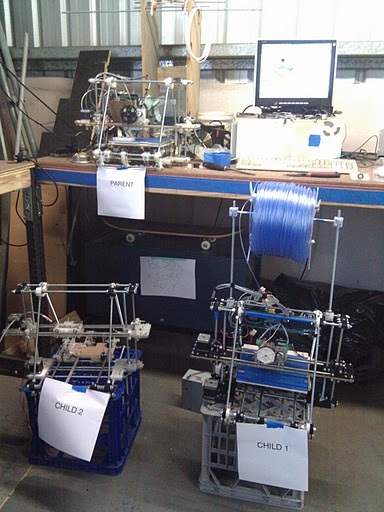
Naturally, after printing many designs from Thingiverse, I wanted to embrace the RepRap movement and print a 3D printer. I scoured the RepRap wiki for ideas and settled on the Ecksbot printer which is a derivative of the Prusa Mendel. Building your own 3D printer is not for the faint of heart but, the savings and knowledge gained is worth the journey. The first issue I ran into is the Ecksbots files are designed to be printed on a larger build platform than what is available on the Replicator. This posed a problem when I wanted to print the Y-Carriage. A request made to the Ecksbot creators yielded a resized Y-Carriage that fit on the Replicator’s build platform. If you plan to build your own and intend to use the Replicator to fabricate the parts, be sure to download the file labeled “Y_Cart_ReplicatorResize_x1.STL.”
Here are some pictures of my mostly completed Ecksbot:


There are two software options supported by Makerbot for use on the Replicator and the recently released Replicator2. The first being ReplicatorG and the second being MakerWare.
ReplicatorG focuses more on the Skeinforge slicing engine whereas MakerWare focuses more on the Miracle-Grue slicing engine in active development by MakerBot.
ReplicatorG:

MakerWare:

MakerWare is currently in beta but offers some welcomed capabilities that are missing from ReplicatorG. My favorite is the ability to import multiple parts onto the build plate. This allows one to easily combine prints into a single session. Another favorite is the ability to run multiple slicing sessions at the same time. Again, the software is in beta and lacks the capability to decipher between the difference in the build area size of the Replicator2 and the Replicator. The way I get around this is to add parts to the build surface in MakerWare, save the session as an STL file and open in ReplicatorG. Now I can adjust as necessary and print from ReplicatorG or MakerWare.
A natural progression after getting comfortable with a 3D printer is to design some objects. There are a number of free offerings that can export to the STL format. The STL file will be converted into g-c0de by the slicer application. A couple of popular free applications is Sketchup and OpenSCAD. Sketchup loosely follows the path of traditional 2D/3D CAD applications while OpenSCAD takes a programming language approach.
Sketchup:

OpenSCAD:

An online offering is Tinkercad:

For just $49 you can pick up Cubify Invent from the makers of the Cube 3D printer. Cubify Invent has many features that are contained in more expensive 3D packages such as Solid Works. The work flow is similar to 123D by AutoDesk (free software). You start your design by drawing a sketch in a 2D plane and selecting extrude or many of the other tools to convert the drawing into a 3D representation. There is a 15 day trial so you can test it out.

Cubify offers some basic video tutorials to get you started. You can also checkout Cubify Fans blog for more in depth tutorials (my favorite).
This wraps up my introduction/experience in 3D printing. I’ll continue this series with some projects that I am working on as I learn to use Cubify. My initial designs are currently centered on modifying the Ecksbot 3D printer I presented above. I’ll also dive deeper into the printable Eggbot I briefly discussed above. Till next post, enjoy!


